
Operating systems can end up being a lot of work for administrators: work to configure the image, work to install the applications, and work to provide the best user experience possible. As with any software, what is provided to you is what the developer intended, but not necessarily what you want or need for your end users.
This blog series introduces you to Windows Operating System (OS) optimizations, starting with version 21H2. I will attempt to keep these optimizations as environment agnostic as possible. Hopefully, these optimizations will be just as good to administrators of physical machines as to a virtual environment utilizing Nutanix Frame, Citrix Virtual Apps and Desktops, or VMware Horizon.
This series aims to share the seemingly infinite number of ways you can optimize a Windows environment, with something for beginners as well as administrators familiar with optimizations but looking to deliver an even better experience within their environment.
Of course, the optimizations provided in this blog series are intended only as a guide. Be sure to vet any optimizations carefully and test the optimizations described in this series internally before pushing the changes to your production environment.
The first entry covered Active Setup. The second entry covered the Microsoft Store. The third entry covered Services and Scheduled Tasks. The fourth entry covered Startup Items. In each case, we discussed what each piece is, how it works, and how to optimize it.
This blog addresses three smaller aspects of your Windows Operating System: Autologgers, Features On-Demand, and Optional Features. While these three items are smaller than any of the previous blog posts individually, there are some definite optimization efforts to be considered here.
Future blogs will discuss, in detail, how to optimize your Windows OS environment by optimizing Group Policy.
What are Autologgers?
Autologgers are a rather unknown area of the operating system and the structure of autologgers is fairly complicated. Let's take a look at this from the top down and then talk about the specific pieces we want to address.
Event Tracing for Windows (ETW) provides a mechanism to trace and log events that are raised by user-mode applications or kernel-mode drivers. Trace Providers are components of those user-mode applications or kernel-mode drivers that utilize ETW technology to generate trace messages or events. Trace Sessions record events from one or more Trace Providers that a Controller enables. An autologger is a Trace Session whose purpose is to record events from Trace Providers during the boot process. Clear as mud, right?
As opposed to previous optimizations in this blog series, autologgers do not affect logon or startup time for the user, as they are started during the boot process. As such, the purpose in optimizing them is to lower resource utilization, which can be beneficial in a couple ways. Overall lower resource utilization frees up your machine to run smoother, but if your environment is in the public cloud (AWS, Azure, GCP, etc.), then you can lower cost while the VMs are running. If your environment is on an on-premises infrastructure, rather than lowering cost, you are freeing up resources that have the added benefit of increasing VM density in a virtualized environment.
What are Features On-Demand?
Features On-Demand, sometimes called Windows Capabilities, are Windows features that can be added at any time. When the Windows OS requires a new feature, it can request the feature package directly from Windows Update. Features On-Demand, known as FODs, can be pre-installed so that they are ready if a user needs them, utilizing the Languages and Optional Features ISO.
Optimizing Features On-Demand can provide both user and machine benefit, depending on the Windows feature. Some features will load on user logon and optimizing them will reduce logon or startup time, while others are machine loaded and don't impact user experience but may cause unneeded resource utilization and density concerns.
What are Optional Features?
As opposed to Features On-Demand, Optional Features exist as part of the Windows OS and can be turned off or on manually through the System Apps & Features applet. Turning them on installs that Optional Feature but isn't tied to Windows Updates like a Feature On-Demand.
Optimizing Optional Features is centered around resource utilization and density, as they generally are installed and run in a per-machine context so have little to no impact on user experience.
What Does this Mean for Me?
Being the first area of optimization I've talked about that isn't purely for the purpose of increasing User Experience, optimizing these three areas can lead to some interesting benefits. Optimizing Autologgers and Optional Features lead to lower resource utilization, which can either increase VM density, in an on-premises environment, or lower monthly cost, in a cloud-based environment. Feature On-Demand can have positive user experience effects, but still is mainly focused on resource utilization.
How Do I Optimize Autologgers in my Environment?
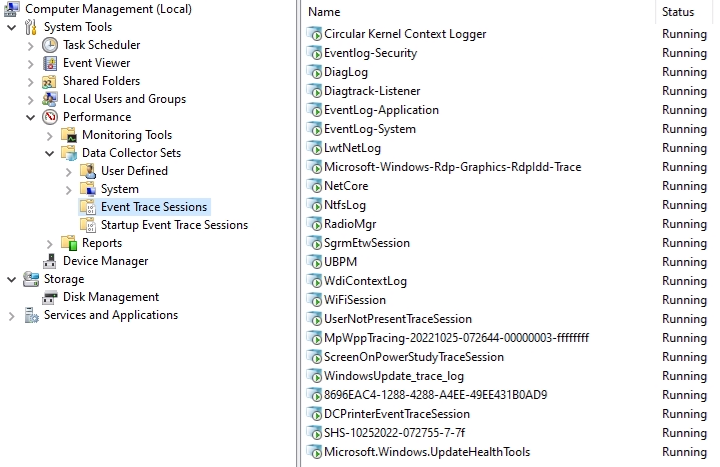
First, let's show you how to view your autologgers. You can view autologgers multiple ways in Windows OS. Firstly, you can view your trace sessions through the Computer Management applet, under Performance | Data Collector Sets | Event Trace Sessions. This view shows all trace sessions, which includes autologgers.
Since that view shows more than just the autologgers we are worried about, a better way to view them is via PowerShell or in the registry. We will look at the registry first.
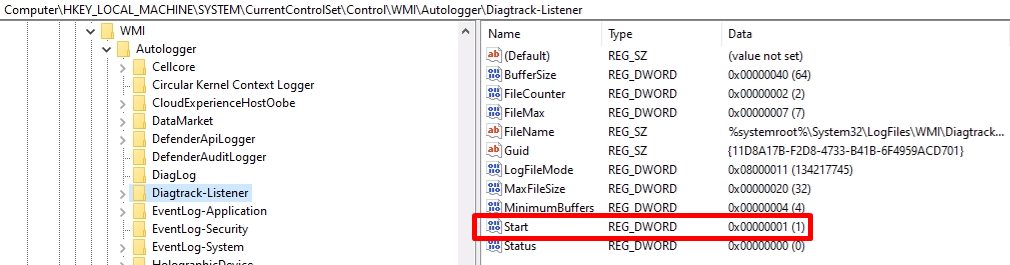
You can find a list of the autologgers in the OS by looking at the HKLM\SYSTEM\CurrentControlSet\Control\WMI\Autologger\ registry key. This key will contain a large number of subkeys that list the actual autologgers that exist.
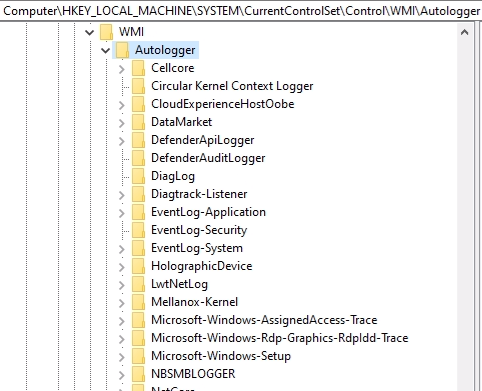
As you can see, there are a large number of autologgers that are shown in this location, but without being able to read the code that exists in the registry values themselves, this list doesn't really provide us with much contextual information. For that, we will want to use PowerShell.
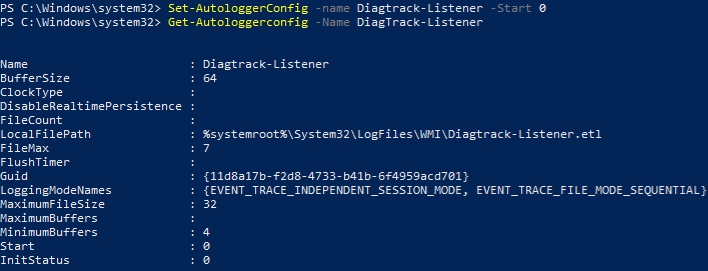
Using PowerShell, we will want to identify the autologgers that exist in your image. To do so, we will use the command Get-AutologgerConfig. The output for this command will show quite a bit of information.
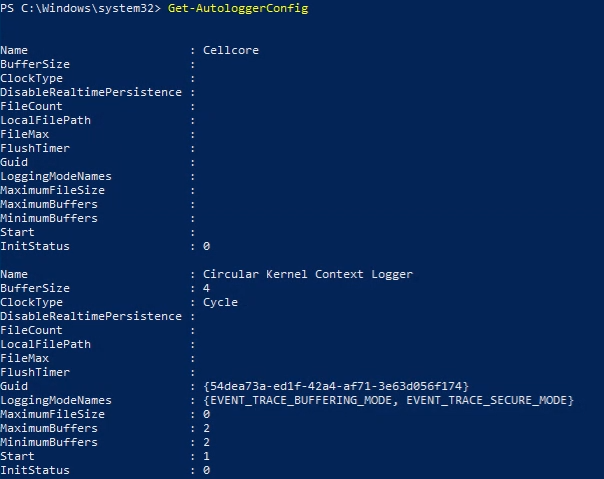
The screenshot above shows two of the many autologgers that exist on the system. Now, the first on the list, Cellcore exists but isn't in use, hence the empty information. Circular Kernel Context Logger, on the other hand, shows quite a bit of information.
If you notice from the screenshot above, under the Circular Kernel Context Logger, there is a field called Start that's set to 1, meaning it's enabled. To optimize this autologger, this is the setting we need to focus on, but this autologger is not one we wish to optimize, so let's find a better one, shall we?
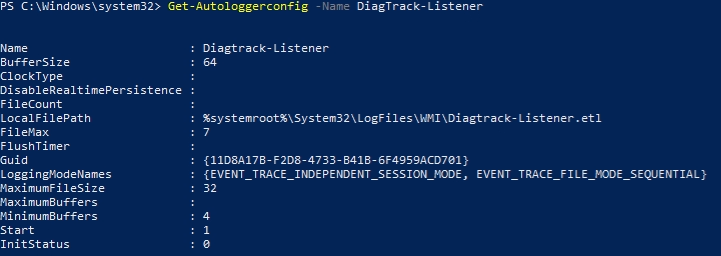
There we go, good old Diagtrack-Listener. I wish I could tell you exactly what this autologger does, but Microsoft hasn't released much information on it. Since it's a telemetry-based autologger, my guess is that's why there isn't much information. As you can see from the screenshot above, this autologger is enabled. So, assuming we want to optimize this autologger, how do we do so?
Well, there's a couple ways to do so. Each autologger registry key contains a registry value called Start. This value is what is referenced by PowerShell as shown in Figure 4.
As such, you can change the Start value of the autologger by changing the matching registry value, either manually or via PowerShell. For PowerShell, you would use
Set-ItemProperty -Path “HKLM:\SYSTEM\CurrentControlSet\Control\WMI\Autologger\(Autologger Name)” -Name Start -Value 0
but PowerShell has a command list specific to autologgers that is the preferred way to work with them.
Set-AutologgerConfig -Name (Autologger Name) -Start 0
is the command to disable autologgers directly via PowerShell, although this command is functionally the same as the command shown previously.
Now here's where it can get a little confusing. Following the instructions above, you would think that rebooting the machine would fully disable the on-boot Diagtrack-Listener autologger, but does it really?
The answer is no, and that's because some, not all, autologgers are tied to services or scheduled tasks. In the case of Diagtrack-Listener, the autologger is tied to Connected Users Experiences and Telemetry, a common service to disable for optimization purposes. As such, if this service is enabled, it will actively re-enable the Diagtrack-Listener autologger.
Does that mean that disabling this service also disables the autologger? Unfortunately, no. This service in particular has its fingers in many pies, so while it verifies and enables the autologger if it's disabled, turning off the service doesn't directly turn off the autologger. I will try, as best I can, to tie my recommended optimizations for autologgers to any external influence in this post.
Please see a previous blog post in this series, Optimizing Services & Scheduled Tasks, for information on how to disable services and/or scheduled tasks as a prerequisite to disabling certain autologgers.
How Do I Optimize Features On-Demand in my Environment?
So first let's show you how to identify your Features On-Demand. As with most things Microsoft, there are multiple ways to do this.
First, you can see the Features On-Demand in GUI form. To do so, click the Start menu and type apps, which will bring up the Apps & Features applet.
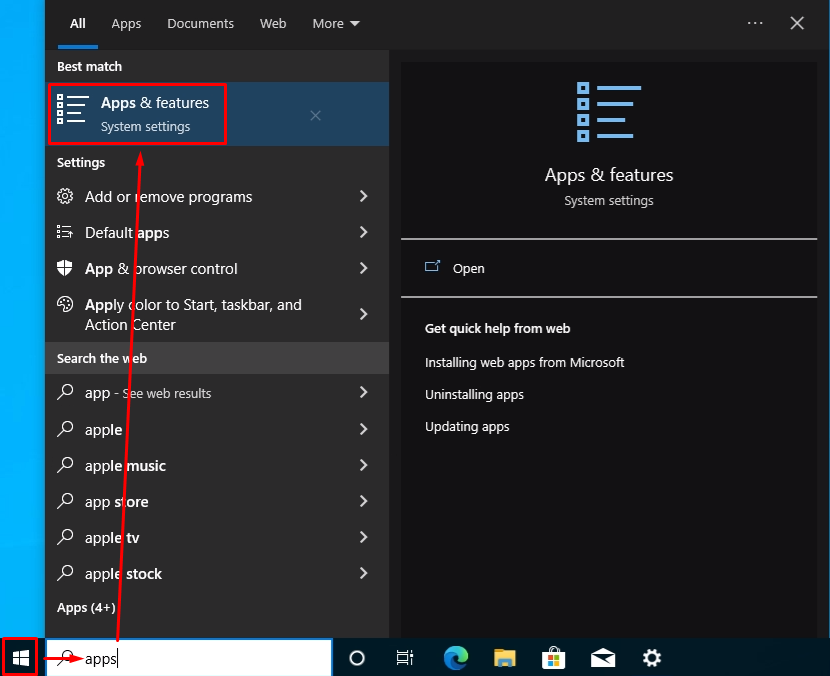
Opening that, you will see the Optional features link under the Apps & Features sub-heading.
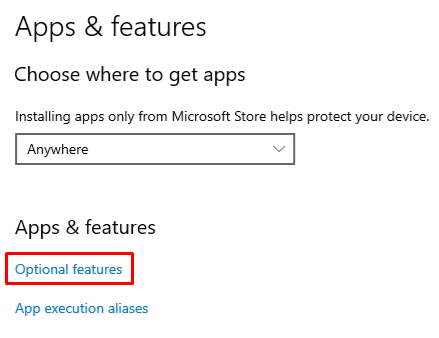
Opening that, you will now be able to see a list of the Features On-Demand. You can highlight each feature and uninstall the feature, if desired. Please note that this view combines Features On-Demand and Optional Features into one list, making it easy to manually optimize each, but hard to understand which is which.
Second, a list of FOD can be found in the registry, although it doesn't appear to be very helpful. You can find a list of the installed FOD at HKLM\Software\Microsoft\Windows\CurrentVersion\Component Based Servicing\CapabilityIndex in sub-keys based upon the name, for example Hello.Face.18967 or Microsoft.Windows.Wordpad. In those sub-keys, there are values that contain versioning information, but nothing that hints at disabling or enabling through the registry.

There is a key location very close at HKLM\Software\Microsoft\Windows\CurrentVersion\Component Based Servicing\ called Features on Demand with a sub-key called Removed FOD Markers. This location has a list of the FOD that have been removed from the system, also containing the version.

This makes it very easy to know how to reinstall the FOD if necessary.
Third, and probably the most helpful for an administrator, PowerShell not only lists out the installed FOD, but also those not present, their version and other helpful information.
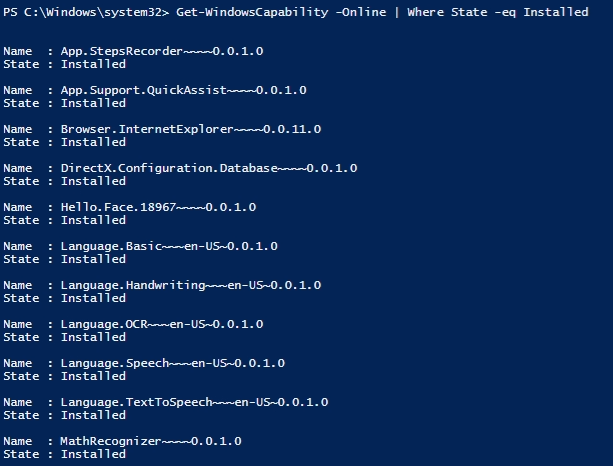
To utilize PowerShell to list out the Features On-Demand, use the Get-WindowsCapability -Online command, but be careful, this list will be large. To list out only those FOD that are installed, you will want to narrow the search. I used the command
Get-WindowsCapability -Online | Where State -eq Installed
This still provides a long list, but for the purposes of optimization, this is where you should start.
Once you have identified the installed FOD you want to optimize, you can get more detailed information using the command
Get-WindowsCapability -Online -Name (Name of FOD)
For example, if you want to know more about Notepad, I would use
Get-WindowsCapability -Online -Name *Notepad*

As you can see, that provides more information about that particular FOD.
Now that we've seen where to look to identify your FOD, let's talk about how to optimize them via PowerShell.
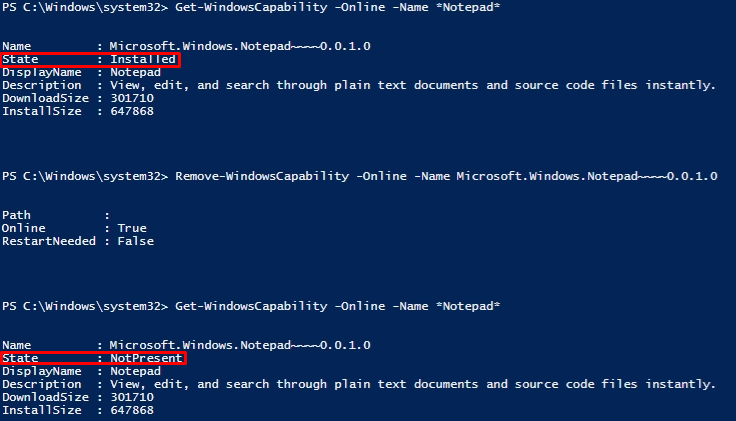
The command for removing Features On-Demand is
Remove-WindowsCapability -Online -Name (Full Name of FOD)
I specify the (Full Name of FOD) here as opposed to the Get-WindowsCapability command for one reason. In my testing, using
Get-WindowsCapability -Online -Name *Notepad*
works just fine, but for Remove-WindowsCapability, the variables don't seem to work the same way.
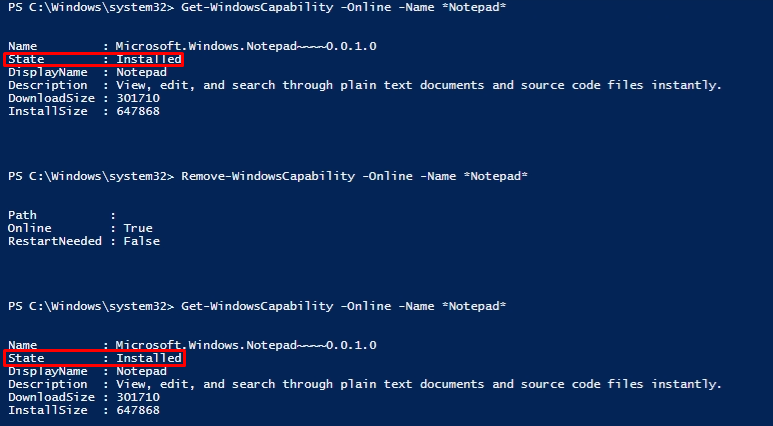
If you see from above, the Remove-WindowsCapability seems to work properly, but when you run Get-WindowsCapability again afterwards, the FOD is still installed. On the other hand, the Remove-WindowsCapability command works properly when you specify the whole name.
How Do I Optimize Optional Features in my Environment?
So last but not least, we have Optional Features. As before we will focus first on identifying the Optional Features that are installed, before talking about how to optimize them.
First, the same as FOD, you can find the list of Optional Features in GUI form in the Optional Features menu.
Second, you can find a list of all possible Optional Features in the registry at HKLM\SOFTWARE\Microsoft\Windows\CurrentVersion\Component Based Servicing\Packages, but beware the list is very long. While this location does show the status of the Optional Feature, you can't affect the install status via the Registry.
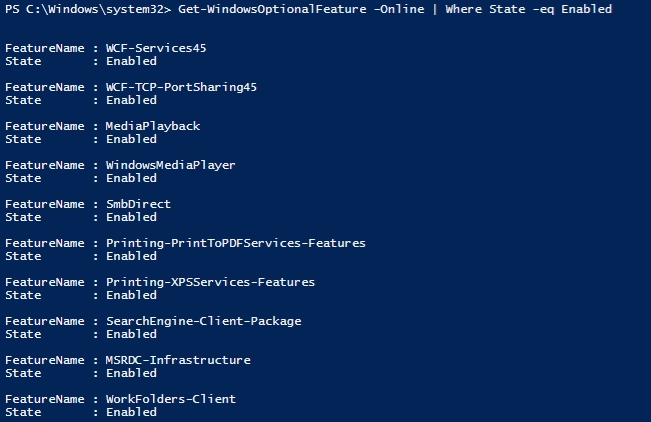
Third, you can use the Get-WindowsOptionalFeature -Online command and, as before, the list will be longer than you may want, as it will list all enabled and disabled Optional Features. To par the list down, you want to execute
Get-WindowsOptionalFeature -Online | Where Start -eq Enabled
Now you can use
Get-WindowsOptionalFeature -Online -FeatureName (Optional FeatureName)
to find further information about the Optional Feature, which can be pertinent to next steps.

As you can see from the above, this Optional Feature has the RestartRequired field as Required, which means optimizing it will require a restart of the machine before the optimization is truly complete.
Now that we've identified all Optional Features, let's talk about optimizing them. Using PowerShell, the command to optimize Optional Features is Disable-WindowsOptionalFeature as in
Disable-WindowsOptionalFeatures -Online -FeatureName (Name of Feature)
If the Feature requires a restart, you will be prompted to perform the restart immediately.

You can suppress the Restart Notification by using the -NoRestart variable. You can also remove all files for the Optional Feature by using the -Remove variable, which provides some optimization benefits as well.

What are the potential downsides to Optimizing Autologgers, Features On-Demand, or Optional Features?
As with any potential optimization, you will have to decide whether or not the optimization will help or hurt your environment. If an autologger gathers information that is necessary for your environment, then disabling that autologger, which prevents the gathering of that information, could cause problems in any environment. If a Feature, whether On-Demand or Optional, is a necessary piece of your particular puzzle, then removing it will prevent proper workflow.
What Autologgers, Features On-Demand and Optional Features can be optimized?
Now onto the part you've all been waiting for: a list of optimization items. Please verify all optimizations before implementing in your environment.
Autologgers
Below is a list of the autologgers that I disable in my environments.
- CloudExperienceHostOOBE
- DiagLog
- Diagtrack-Listener
- ReadyBoot
- WDIContextLog
- WiFiDriverIHVSession
- WiFiSession
Features On-Demand
Below is a list of the Features On-Demand that I disable in my environments.
- App.StepsRecorder
- App.Support.QuickAssist
- Browser.InternetExplorer
- Hello.Face
- Media.WindowsMediaPlayer
- Microsoft.Windows.MSPaint
- Microsoft.Windows.WordPad
- Print.Management.Console
Optional Features
Below is a list of the Optional Features that I disable in my environments.
- MediaPlayback
- WindowsMediaPlayer
- Printing-XPSServices-Features
- MSRDC-Infrastructure
- Internet-Explorer-Optional-amd64
- WorkFolders-Client
Additional Tips
If necessary, re-enabling an autologger is the same command as to disable it, just setting the Start value to 1 using:
Set-AutologgerConfig -Name (Autologger Name) -Start 1
Feature On-Demand is a tad more complicated, as you are not re-enabling a feature, but reinstalling one.
Add-WindowsCapability -Online -Name (Full Name of FOD)
is the command, but a restart of the OS must have occurred between the removing and re-installing a FOD; otherwise, the command will fail, despite PowerShell not prompting you to do so.
Similarly, an Optional Feature is a reinstall rather than a re-enable, despite the command name. The command is
Enable-WindowsOptionalFeature -Online -FeatureName (Name of FOD)
but as opposed to the FOD command, not only will this command prompt for a restart, but the command can be run immediately after disabling the Optional Feature without a restart being necessary.
What's Next?
This post covers Autologgers, Features On-Demand, and Optional Features, as they relate to Operating System optimization. As always, we recommend checking all Autologgers, Features On-Demand, and Optional Features, either periodically or after each Windows update cycle or application installation, to verify new entries have or have not been added. If they have, vet them for purpose, and then optimize them or not as needed.
The next blog post will discuss optimizing Group Policy. Due to the way group policy works, this area of your environment directly corresponds to End User Experience (UX) as group policy can greatly impact your boot, logon, and startup times, and should be considered for any optimization task.
Contact Us
Need help with your Frame deployment, have an idea for a new use case, or just want to learn more about Frame?
Email us at frame-sales@dizzion.com and one of our experts will reach out!
Follow Us


More content created by
Jake Norman© 2024 Dizzion, Inc. All rights reserved. Frame, the Frame logo and all Dizzio product, feature and service names mentioned herein are registered trademarks of Dizzion, Inc. in the United States and other countries. All other brand names mentioned herein are for identification purposes only and may be the trademarks of their respective holder(s). This post may contain links to external websites that are not part of Dizzion. Dizzion does not control these sites and disclaims all responsibility for the content or accuracy of any external site. Our decision to link to an external site should not be considered an endorsement of any content on such a site. Certain information contained in this post may relate to or be based on studies, publications, surveys and other data obtained from third-party sources and our own internal estimates and research. While we believe these third-party studies, publications, surveys and other data are reliable as of the date of this post, they have not independently verified, and we make no representation as to the adequacy, fairness, accuracy, or completeness of any information obtained from third-party sources.